
 11 de marzo de 2024
Superalimente la gestión y la automatización con Ansible Azure
Aprovisionamiento de recursos de Azure con Ansible Azure
Después de asegurarse de que Ansible esté autenticado con Azure, es hora de poner esa sinergia a trabajar. El aprovisionamiento de recursos con Ansible Azure implica el uso de guías de Ansible para automatizar la creación de recursos de Azure, como máquinas virtuales, cuentas de almacenamiento, redes y más.
Ansible proporciona módulos diseñados para interactuar con las API de Azure, lo que le permite administrar rápidamente los recursos de Azure a través de la automatización.
Para aprovisionar recursos de Azure con Ansible Azure, realice lo siguiente, donde agregará fragmentos a un libro de estrategias paso a paso:
1. Crea un archivo llamado implementar_vm.yml como su manual de estrategias de Ansible y agregue el siguiente fragmento.
Este fragmento describe la estructura de un manual de Ansible destinado a implementar una máquina virtual en Azure.
---
# Specify the name of the playbook aimed at Deploying an Azure VM
- name: Deploy Virtual Machine in Azure
  # Define the target hosts where the tasks will be executed.
  hosts: localhost
  # Specify the list of tasks to be executed.
  tasks:
2. A continuación, agregue el siguiente fragmento a su libro de estrategias, que crea un grupo de recursos de Azure llamado myResourceGroup-001 en el eastus región.
Su infraestructura de Azure se extiende a lo largo de un panorama digital con máquinas virtuales, bases de datos y cuentas de almacenamiento. En medio de esta complejidad se encuentra el faro del orden: el grupo de recursos.
Un grupo de recursos sienta las bases para una gestión eficiente de la infraestructura y permite una integración perfecta con las capacidades de automatización de Ansible. Todos los recursos de Azure deben pertenecer a un grupo de recursos.
    # Define the task to create a resource group.
    - name: Create Resource Group
      # Use the azure_rm_resourcegroup module to manage Azure resource groups.
      azure_rm_resourcegroup:
        # Specify the name of the resource group to be created.
        name: myResourceGroup-001
        # Specify the Azure region where the resource group will be created.
        location: eastus
3. Complete el siguiente fragmento con el mismo libro de estrategias, lo que crea un red virtual (VNet).
En Azure, una VNet aísla lógicamente la red en la nube. Puede usar una VNet para conectar de forma segura recursos de Azure, como máquinas virtuales, entre sí, a Internet e incluso a redes locales.
    # Define the task of creating a virtual network.
    - name: Create Virtual Network
      # Use the azure_rm_virtualnetwork module to manage Azure VNets.
      azure_rm_virtualnetwork:
        # Specify the resource group in which the virtual network will be created.
        resource_group: myResourceGroup-001
        # Specify the name of the virtual network to be created.
        name: myVirtualNetwork-001
        # Specify the address prefixes for the virtual network.
        address_prefixes:
          - "13.0.0.0/16"
        # Specify the Azure region where the virtual network will be created.
        location: eastus
4. Ahora, cree una subred agregando el siguiente fragmento a su libro de estrategias.
Piense en las subredes como particiones inteligentes dentro de su VNet que ayudan a organizar y segmentar los recursos de su red. Esta organización facilita la administración de los recursos de su red y aumenta su control sobre el flujo de tráfico y la seguridad.
    # Define the task to create a subnet.
    - name: Create Subnet
      # Use the azure_rm_subnet module to manage Azure subnets.
      azure_rm_subnet:
        # Specify the resource group where the virtual network resides.
        resource_group: myResourceGroup-001
        # Specify the name of the virtual network where the subnet will be created.
        virtual_network_name: myVirtualNetwork-001
        # Specify the name of the subnet to be created.
        name: mySubnet-001
        # Specify the address prefix for the subnet.
        address_prefix: "13.0.1.0/24"
5. Agregue otro fragmento al libro de jugadas, que crea una IP pública.
Las direcciones IP públicas permiten que los recursos de Azure, como las máquinas virtuales y las puertas de enlace de aplicaciones, se comuniquen con Internet u otros recursos de Azure a través de Internet.
    # Define the task to create a public IP address.
    - name: Create Public IP Address
      # Use the azure_rm_publicipaddress module to manage Azure public IP addresses.
      azure_rm_publicipaddress:
        # Specify the resource group where the public IP address will be created.
        resource_group: myResourceGroup-001
        # Specify the allocation method for the public IP address (Static or Dynamic).
        allocation_method: Static
        # Specify the name of the public IP address to be created.
        name: myPublicIP-001
        # Specify the SKU (Standard or Basic) for the public IP address.
        sku: Standard
        # Specify the Azure region where the public IP address will be created.
        location: eastus
6. Posteriormente, ingrese el siguiente fragmento en su libro de jugadas, que crea un Grupo de seguridad de red (NSG) que le permite controlar el tráfico entrante y saliente a sus recursos de Azure.
Un NSG actúa como un firewall virtual que filtra el tráfico de red según reglas definidas por el usuario.
    # Define the task to create an NSG.
    - name: Create Network Security Group
      # Use the azure_rm_securitygroup module to manage Azure NSGs.
      azure_rm_securitygroup:
        # Specify the resource group where the NSG will be created.
        resource_group: myResourceGroup-001
        # Specify the name of the NSG to be created.
        name: myNSG-001
        # Specify the Azure region where the NSG will be created.
        location: eastus
7. Continuando, cree una tarjeta de interfaz de red virtual (NIC) agregando el siguiente fragmento al manual.
Cada NIC virtual se asocia con un recurso de Azure específico, como una máquina virtual, y le otorga el poder de conectarse con otros recursos dentro de su VNet. Las NIC virtuales también pueden aventurarse a redes externas, incluida la gran extensión de Internet.
Además, las NIC brindan acceso a direcciones IP, clasifican el enrutamiento y mantienen su red segura con funciones ingeniosas.
    # Define the task to create a Virtual NIC.
    - name: Create Virtual Network Interface Card
      # Use the azure_rm_networkinterface module to manage Azure Virtual NICs.
      azure_rm_networkinterface:
        # Specify the resource group where the Virtual NIC will be created.
        resource_group: myResourceGroup-001
        # Specify the name of the Virtual NIC to be created.
        name: myNIC-001
        # Specify the name of the VNet where the Virtual NIC will be connected.
        virtual_network: myVirtualNetwork-001
        # Specify the Subnet's name within the VNet where the Virtual NIC will be located.
        subnet: mySubnet-001
        # Specify the name of the Public IP Address associated with the Virtual NIC.
        public_ip_name: myPublicIP-001
        # Specify the Azure region where the Virtual NIC will be created.
        location: eastus
8. Agregue el siguiente fragmento al manual, que crea una máquina virtual de Azure.
Las máquinas virtuales de Azure proporcionan recursos informáticos escalables y bajo demanda, lo que le permite implementar y administrar cargas de trabajo virtualizadas sin la necesidad de mantener hardware físico.
    # Define the task to create a VM.
    - name: Create Virtual Machine
      # Use the azure_rm_virtualmachine module to manage Azure VMs.
      azure_rm_virtualmachine:
        # Specify the resource group where the VM will be created.
        resource_group: myResourceGroup-001
        # Specify the name of the VM to be created.
        name: myVM-001
        # Specify the size of the VM.
        vm_size: Standard_DS1_v2
        # Specify the username for the VM's admin account.
        admin_username: azureuser
        # Specify the password for the VM's admin account.
        admin_password: Azureuser@2023
        # Enable password-based SSH authentication.
        ssh_password_enabled: True
        # Specify the image details for the VM.
        image:
          offer: UbuntuServer
          publisher: Canonical
          sku: '18.04-LTS'
          version: latest
        # Specify tags for the VM.
        tags:
          environment: production
Siguiendo los pasos hasta este punto, tendrás el manual completo mostrado a continuación.
Este manual aprovisiona varios recursos en Azure, incluido un grupo de recursos, una red virtual, una subred, una dirección IP pública, una tarjeta de interfaz de red (NIC) y la propia máquina virtual.
La sintaxis declarativa de Ansible y los módulos de Azure agilizan la definición y ejecución de tareas de aprovisionamiento, lo que le permite escalar su infraestructura de manera eficiente en la nube de Azure.
---
# Specify the name of the playbook aimed at Deploying an Azure VM
- name: Deploy Virtual Machine in Azure
  # Define the target hosts where the tasks will be executed.
  hosts: localhost
  # Specify the list of tasks to be executed.
  tasks:
    # Define the task to create a resource group.
    - name: Create Resource Group
      # Use the azure_rm_resourcegroup module to manage Azure resource groups.
      azure_rm_resourcegroup:
        # Specify the name of the resource group to be created.
        name: myResourceGroup-001
        # Specify the Azure region where the resource group will be created.
        location: eastus
    # Define the task of creating a virtual network.
    - name: Create Virtual Network
      # Use the azure_rm_virtualnetwork module to manage Azure VNets.
      azure_rm_virtualnetwork:
        # Specify the resource group in which the virtual network will be created.
        resource_group: myResourceGroup-001
        # Specify the name of the virtual network to be created.
        name: myVirtualNetwork-001
        # Specify the address prefixes for the virtual network.
        address_prefixes:
          - "13.0.0.0/16"
        # Specify the Azure region where the virtual network will be created.
        location: eastus
    # Define the task to create a subnet.
    - name: Create Subnet
      # Use the azure_rm_subnet module to manage Azure subnets.
      azure_rm_subnet:
        # Specify the resource group where the virtual network resides.
        resource_group: myResourceGroup-001
        # Specify the name of the virtual network where the subnet will be created.
        virtual_network_name: myVirtualNetwork-001
        # Specify the name of the subnet to be created.
        name: mySubnet-001
        # Specify the address prefix for the subnet.
        address_prefix: "13.0.1.0/24"
    # Define the task to create a public IP address.
    - name: Create Public IP Address
      # Use the azure_rm_publicipaddress module to manage Azure public IP addresses.
      azure_rm_publicipaddress:
        # Specify the resource group where the public IP address will be created.
        resource_group: myResourceGroup-001
        # Set the allocation method for the public IP address (Static or Dynamic).
        allocation_method: Static
        # Specify the name of the public IP address to be created.
        name: myPublicIP-001
        # Specify the SKU (Standard or Basic) for the public IP address.
        sku: Standard
        # Specify the Azure region where the public IP address will be created.
        location: eastus
    # Define the task to create an NSG.
    - name: Create Network Security Group
      # Use the azure_rm_securitygroup module to manage Azure NSGs.
      azure_rm_securitygroup:
        # Specify the resource group where the NSG will be created.
        resource_group: myResourceGroup-001
        # Specify the name of the NSG to be created.
        name: myNSG-001
        # Specify the Azure region where the NSG will be created.
        location: eastus
    # Define the task to create a Virtual NIC.
    - name: Create Virtual Network Interface Card
      # Use the azure_rm_networkinterface module to manage Azure Virtual NICs.
      azure_rm_networkinterface:
        # Specify the resource group where the Virtual NIC will be created.
        resource_group: myResourceGroup-001
        # Specify the name of the Virtual NIC to be created.
        name: myNIC-001
        # Specify the name of the VNet where the Virtual NIC will be connected.
        virtual_network: myVirtualNetwork-001
        # The Subnet's name within the VNet where the Virtual NIC will be located.
        subnet: mySubnet-001
        # Specify the name of the Public IP Address associated with the Virtual NIC.
        public_ip_name: myPublicIP-001
        # Specify the Azure region where the Virtual NIC will be created.
        location: eastus
    # Define the task to create a VM.
    - name: Create Virtual Machine
      # Use the azure_rm_virtualmachine module to manage Azure VMs.
      azure_rm_virtualmachine:
        # Specify the resource group where the VM will be created.
        resource_group: myResourceGroup-001
        # Specify the name of the VM to be created.
        name: myVM-001
        # Specify the size of the VM.
        vm_size: Standard_DS1_v2
        # Specify the username for the VM's admin account.
        admin_username: azureuser
        # Specify the password for the VM's admin account.
        admin_password: Azureuser@2023
        # Enable password-based SSH authentication.
        ssh_password_enabled: True
        # Specify the image details for the VM.
        image:
          offer: UbuntuServer
          publisher: Canonical
          sku: '18.04-LTS'
          version: latest
        # Specify tags for the VM.
        tags:
          environment: production
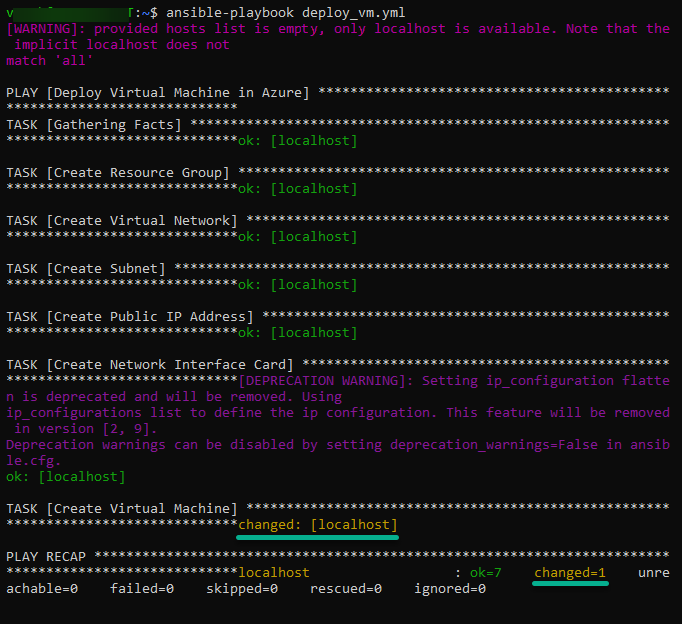
9. Finalmente, ejecute el ansible-playbook comando a continuación para ejecutar su libro de jugadas (deploy_vm.yml) utilizando el
ansible-playbook deploy_vm.ymlSi todo va bien, se iniciará el proceso de creación de recursos de Azure y aparecerá el siguiente resultado.

Leave a comment